TL;DR
Choose portrait display boards for vertically structured posters, profiles and areas with limited frontage. Choose landscape display boards for wide graphics, timelines, tables, schedules and diagrams. Confirm the orientation before final artwork approval, and check the usable display area, viewing distance and full board run so the graphics and installation work together.
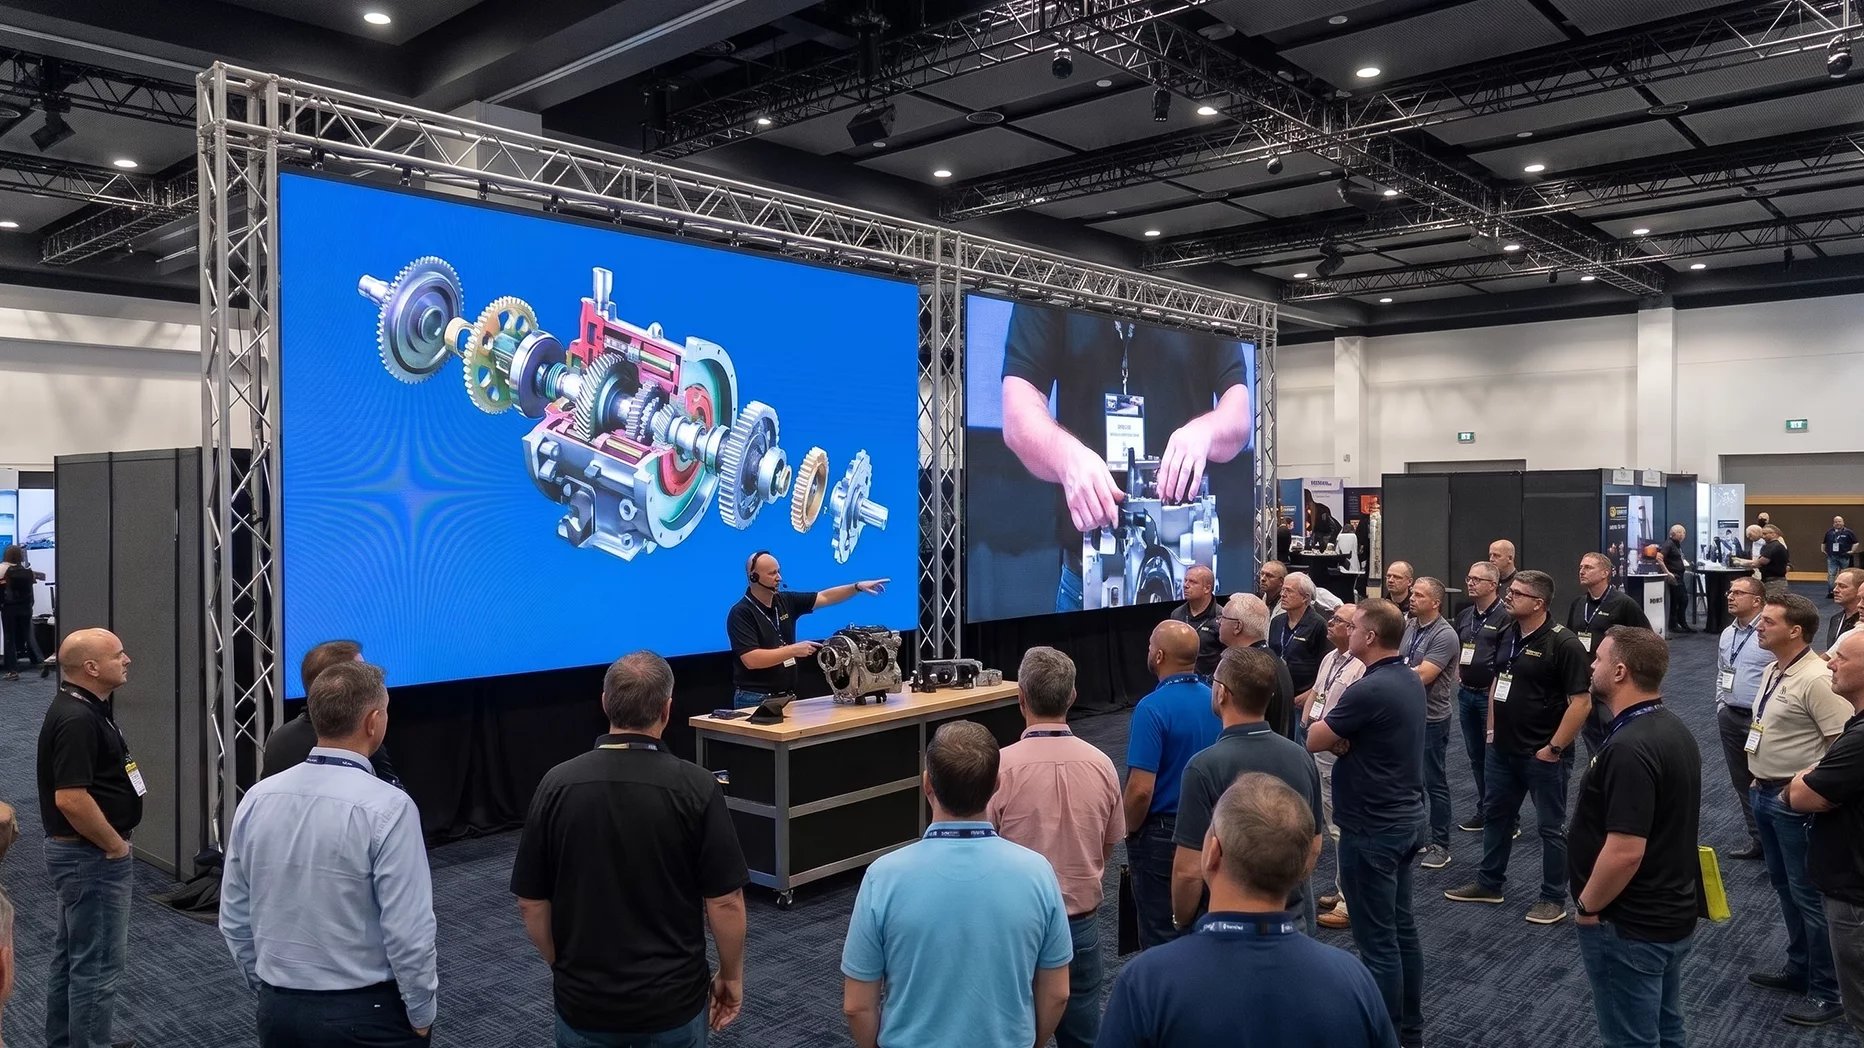
LED screens support exhibition product demonstrations by magnifying small product details, displaying live camera close-ups, presenting software interfaces and showing processes that visitors cannot easily see on the physical product. The setup is most effective when you specify screen size, pixel pitch, position, and content around the demonstration and expected viewing distance.
A product demonstration may work for visitors closest to the demonstration table while leaving everyone behind them unable to see the detail being discussed.
A presenter may be explaining a connector, control panel or small mechanism that is clearly visible at arm’s length but almost impossible to inspect from several metres away. A software interface may look clear on the presenter’s laptop yet become unreadable for people gathering around an exhibition stand.
The LED screen should supplement the physical product by showing details that visitors cannot see clearly from their viewing position. A camera can magnify fine product features. A computer source can show a live software workflow. Prepared video can explain internal processes that cannot be demonstrated repeatedly on the stand.
With LED video walls for exhibitions, the product, presenter and supporting screen content should be positioned so visitors can follow the live demonstration and on-screen detail without unnecessary changes in viewing direction.
How Do LED Screens Make Product Demonstrations Easier To See?
An LED screen extends the visible demonstration beyond the visitors standing immediately beside the product.
Consider a presenter demonstrating a compact control system. Visitors at the front may see every button being pressed, while attendees behind them see only the presenter and the top of the device.
A correctly framed live camera feed can put the same control panel onto the LED wall at a much larger scale.
This can help visitors see:
- Small buttons and controls.
- Connectors and ports.
- Fine assembly work.
- Mechanical movement.
- Product interfaces.
- Test results.
- Small components.
- Presenter hand movements.
This gives visitors beyond the front row access to the same controls, mechanisms or product details being discussed by the presenter.
The LED screen should reinforce the physical demonstration by making important product details easier to see without competing with the product itself.
Which Product Demonstrations Benefit Most From An LED Screen?
LED support is most useful when an important part of the demonstration is difficult to see directly, exists digitally, or cannot be reproduced practically on the stand.
Physical And Technical Products
Machinery, electronic devices, tools, components, medical equipment and engineering products may contain controls or mechanisms that are too small for several visitors to inspect simultaneously.
A close-up camera view can show the exact feature being discussed while the physical product remains in front of the audience.
This is particularly useful for demonstrations involving:
- Component installation.
- Control adjustments.
- Product assembly.
- Fine mechanical movement.
- Testing procedures.
- Connections and ports.
- Small display panels.
Software And Digital Products
A presentation computer can route a live software demonstration through the video processing system to the LED wall, while prepared interface recordings can run from a separate playback source.
The screen may display:
- Dashboards.
- Applications.
- Configuration tools.
- Control interfaces.
- Live data.
- Product workflows.
- Monitoring systems.
Interface-heavy demonstrations need careful content planning. Text and controls that are easy to read on a laptop may become difficult to read if the computer image is scaled to fit only part of a wide LED canvas.
Processes That Cannot Be Shown Live
Some processes take too long, require another environment or involve internal parts that visitors cannot see during normal operation.
Prepared footage or animation can show:
- Assembly sequences.
- Installation.
- Testing.
- Manufacturing stages.
- Internal operation.
- Configuration steps.
- Before-and-after results.
The presenter can then use the physical product for the parts that benefit from live interaction.
How Can Live Camera Feeds Improve A Product Demonstration?
A live camera feed lets visitors see magnified product detail in real time during the demonstration.
This use of live video is related to IMAG, or image magnification. At an exhibition, IMAG might show a connector being fitted, a small mechanism moving, a control being adjusted or the presenter’s hands completing a technical process.
A simplified live-camera signal path may be:
Camera → Vision Mixer or Video Switcher → LED Processor/Controller → LED Wall
The precise signal chain depends on the production requirements.
A simple demonstration may use one camera. A scheduled product launch may combine:
- Live camera feeds.
- Product videos.
- Presentation graphics.
- Computer output.
- Holding graphics.
- Multiple camera angles.
Depending on the setup, a vision mixer or screen-management processor can switch sources, scale inputs, recall layouts and position multiple video windows before the signal reaches the LED display system. Professional screen-management systems can handle source selection, scaling, screen mapping, window layouts and multi-screen output where the demonstration requires them.
The crew responsibilities should also be clear. A camera operator captures the image. A vision mixer operator may select between camera, computer and playback feeds. The LED technician manages the display-side configuration and output. On smaller productions, some of these responsibilities may be combined.
Should You Use A Live Demo Or Pre-Recorded Product Video?
Neither format is automatically better. The choice depends on what visitors need to understand and what you can reliably demonstrate on the stand.
| Demo Format | Best Used When | Main Consideration |
| Live product demo | Visitors need to see the product operate in real time. | Product reliability and presenter coordination. |
| Live camera close-up | Small details are difficult for a group to see. | Camera position and framing. |
| Pre-recorded demo | The process is lengthy, repetitive, or unavailable on the stand. | Video format and LED canvas. |
| Software screen capture | A digital workflow or interface is being demonstrated. | Resolution, scaling and text readability. |
| Live + pre-recorded | The presenter needs supporting visuals during a physical demo. | Source switching and rehearsal. |
Prepared video can be particularly useful when the process cannot be repeated every few minutes.
A manufacturer might demonstrate external controls live while an animation shows what happens inside the machine after those controls are activated.
Between scheduled demonstrations, the screen can run a prepared product loop while stand staff speak with visitors.
What Should Appear On The LED Screen During A Product Demo?
Each screen state should support the specific product feature or process the presenter is explaining at that moment.
Useful screen content may include:
- Live product close-ups.
- Software output.
- Product diagrams.
- Short feature labels.
- Performance data.
- Before-and-after comparisons.
- Internal component animations.
- Product specifications.
- Pre-recorded process footage.
- Comparison layouts.
- Holding graphics.
Avoid placing several competing graphics, specifications, and video windows on screen at the same time.
If the presenter is demonstrating a small mechanism, the live image should occupy enough of the LED canvas so that the relevant detail is visible. Surrounding it with several small information panels can reduce the usefulness of the close-up.
Custom-format LED walls also need content prepared for the actual pixel canvas rather than assuming every display will use a standard 16:9 format.
How Large Should An LED Screen Be For A Product Demonstration?
Screen size should be based on stand dimensions, demonstration position, content and expected visitor viewing distance.
Important factors include:
- Stand width.
- Available display height.
- Closest visitor position.
- Expected audience size.
- Product dimensions.
- Demonstration-table position.
- Main aisle position.
- Screen height.
- Content type.
- Visitor sightlines.
A larger wall may be justified when visitors several rows back need to see small product controls, interface text or close-up camera footage.
On a compact stand, however, an oversized wall can consume valuable demonstration space or visually compete with the physical product.
The screen should provide enough image area to make important details clear while keeping the physical product central to the demonstration.
How Do Pixel Pitch And Viewing Distance Affect Product Detail?
Pixel pitch helps determine how an LED image appears at close viewing distances.
Pixel pitch is the distance between the centres of neighbouring LED pixels and is measured in millimetres. A smaller pitch places pixels closer together and increases pixel density for a given display area.
This matters particularly at exhibitions because visitors may approach an LED wall much more closely than audiences at a large conference or outdoor event.
The required pitch should be considered against:
- Closest expected viewing position.
- Typical visitor distance.
- Screen dimensions.
- Product-detail requirements.
- Interface text size.
- Camera use.
- Content resolution.
Suitable viewing distance depends on pixel pitch, screen size, content detail and expected visitor position, so choosing the smallest available pitch is not always necessary.
For exhibition stands with close viewing distances, LED pixel pitch and viewing distance should be considered alongside screen size, product detail, and camera use because visitors may approach much closer than audiences at larger events.
Where Should The LED Screen Be Positioned On The Exhibition Stand?
Screen positioning should start with the visitor approach path and expected demonstration viewing area.
Consider:
- Which aisle visitors approach from.
- Where the product first becomes visible.
- Where the presenter will stand.
- Where viewers are likely to gather.
- How high the display needs to be.
- Which screen areas may be blocked by visitors.
- Where cameras need to be positioned.
- How neighbouring stands affect sightlines.
A rear LED wall can work well when the demonstration takes place directly in front of it.
A side-positioned screen may make more sense when the physical product already occupies the rear of the stand or when putting the LED wall behind the presenter would create poor camera angles.
Visitors should ideally be able to move their attention between the physical product and supporting screen image without having to face completely different parts of the stand.
How Should Visitor Traffic Affect The Demonstration Layout?
Product demonstrations can create temporary groups of visitors, so the viewing area needs to be considered alongside normal stand traffic.
The layout should account for:
- Visitor entry.
- Demonstration position.
- Viewing area.
- Presenter movement.
- Staff access.
- Camera position.
- Product access.
- Exit path.
- Main aisle visibility.
Where the stand design and organiser restrictions allow, the LED display should remain visible beyond the first row of visitors gathering around the demonstration.
This is particularly useful for compact products. Even if passers-by cannot see the physical device through the group, the screen can still show what the presenter is doing.
The audience should not need to block the stand entrance simply to see the product detail.
How Should Product Demo Content Be Designed For An Exhibition Hall?
Product-demo content should be sized for the actual viewing distance and display canvas rather than adapted at the last minute from another marketing format.
Size text, interface elements and product close-ups for the intended aisle and demonstration viewing distances.
Useful practices include:
- Keep labels concise.
- Enlarge important interface elements.
- Use tightly framed product close-ups.
- Avoid dense paragraphs.
- Keep comparison graphics easy to scan.
- Create content for the actual screen aspect ratio.
- Reserve sufficient area for live camera windows.
- Prepare an approved holding state between demonstrations.
A standard 16:9 brand video may require adaptation when the exhibition wall uses a panoramic or custom pixel canvas.
Small subtitles and detailed software controls that look clear on a desktop monitor may be difficult to read from the main aisle.
What AV Equipment May Be Needed For A Live Product Demonstration?
The equipment should match the number of video sources and the complexity of the demonstration.
A single-source demonstration may require:
- LED wall and controller/processor.
- Presentation computer or playback source.
- Appropriate signal cabling.
A live close-up may add:
- Camera.
- Camera support.
- Camera operator where required.
- Suitable HDMI or SDI signal route.
- Vision mixer or video switcher where required.
A multi-source demonstration may include:
- Multiple cameras.
- Vision mixer.
- Presentation computer.
- Playback system.
- Preview monitor.
- Several video inputs.
- Audio equipment where required.
- Backup source.
A multi-source workflow may follow:
Camera / Presentation Computer / Playback → Vision Mixer or Video Switcher → LED Processor/Controller → LED Wall
Not every exhibition demonstration requires complex switching or screen-management equipment. The technical setup should match the number of sources and the planned demonstration sequence.
If one tested playback source supplies a single product video throughout the day, additional switching equipment may add unnecessary complexity.
The production design should match the actual demonstration sequence.
When Is Onsite Technical Cover Useful?
Onsite technical support is especially useful when the LED wall handles live cameras, software feeds, multiple sources, or scheduled source changes.
This may include:
- Multiple live camera feeds.
- Frequent source changes.
- Software demonstrations.
- Multi-window layouts.
- Custom LED canvases.
- Scheduled product launches.
- Repeated presenter-led demonstrations.
- Backup-source requirements.
Installation and commissioning may be separate from live content operation, so responsibility for source switching and screen control should be confirmed before the event.
If the screen needs camera switching, source changes, or layout recalls while the presenter is demonstrating the product, responsibility for those actions should be agreed before exhibition day.
What Should Be Tested Before The Exhibition Opens?
Test the complete demonstration as visitors will experience it rather than checking the LED wall and product separately.
Test:
- Product position.
- Presenter position.
- Camera angle.
- Camera focus.
- Camera exposure.
- Live camera output.
- Product close-ups.
- Computer output.
- Playback files.
- Screen mapping.
- Source scaling.
- Content resolution.
- Audio playback where used.
- Source switching.
- Demonstration timing.
- Holding graphics.
- Backup source.
The demonstration should then be assessed from representative visitor positions rather than only from the technical control position.
Check it from:
- The stand entrance.
- The main aisle.
- The expected visitor gathering area.
This can reveal blocked sightlines, unreadable interface elements, poor camera framing and screen layouts that looked acceptable only from the control position.
When booking an LED wall, provide the stand dimensions, closest viewing distance, product position, content format and planned video sources so the display and processing requirements can be confirmed before installation. The site’s current booking information also requests details such as content type, viewing requirements and additional AV needs for this reason.
Common LED Screen Product Demonstration Mistakes
- Making The Screen More Important Than The Product
The physical product can lose focus if unrelated promotional content continues playing while the presenter is demonstrating a specific feature.
Correction: Match the screen state to the feature or process currently being demonstrated.
- Showing Product Details That Are Too Small
A live camera feed adds little value if the relevant product detail occupies only a small percentage of the displayed image.
Correction: Frame the required component closely and give the live image enough space within the LED canvas.
- Using Standard Content On A Custom Led Canvas
A panoramic or custom-format wall may not display standard 16:9 material as intended.
Correction: Confirm the final pixel canvas before producing videos, graphics and software layouts.
- Positioning The Screen Away From The Product
Visitors may lose the connection between the physical action and the supporting visual if they have to face another part of the stand.
Correction: Plan the presenter, product and LED display as one viewing area.
- Using Live Video Without Rehearsing Camera Angles
Poor framing can obscure the component or action the presenter is describing.
Correction: Rehearse the full sequence and confirm the camera position, framing and focus for each important product detail.
- Relying On A Single Untested Source
A software or playback source can develop output, compatibility or connection issues during a live demonstration.
Correction: Test the primary source through the actual switching and processing path and prepare an appropriate backup for critical demonstrations.
- Switching Sources Without Defined Cues
The presenter may move to the next product feature before the corresponding camera or playback source reaches the LED wall.
Correction: Agree clear source-change cues between the presenter and assigned video operator.
- Leaving The Screen Blank Between Demonstrations
An unintended blank screen can make the display appear inactive or faulty.
Correction: Prepare a holding graphic, concise product overview or approved demo loop for periods between scheduled demonstrations.
Conclusion
An LED screen adds the most value when it makes product details, digital interfaces or processes easier for exhibition visitors to see and understand.
It may magnify a small component for visitors farther back, display a software interface, show an internal process that cannot be seen directly, compare product states or give a larger group access to the same live camera view.
The technical plan should start with the demonstration sequence, visitor viewing positions and the content that needs to appear on screen. Define what visitors need to see, where they are likely to stand, which parts require camera coverage and which content sources will be used. Screen size, pixel pitch, screen mapping, camera positions and source switching can then be specified around that workflow.
If you are preparing an exhibition product demonstration in London, LED Video Wall Hire can coordinate the LED wall, playback sources, live camera feeds and onsite technical cover around the stand and demonstration format. Call 0207 177 4075 or request a no-obligation quote.
FAQs
Can An LED Screen Show A Live Product Demonstration?
Yes. A camera feed can be routed through the event video system and displayed on the LED wall during the physical demonstration. This is particularly useful when visitors need to see small controls, connectors, mechanisms or detailed hand movements that are difficult to view directly from farther back.
What Camera Is Needed For An Exhibition Product Demo?
The camera should match the required framing, mounting position, signal route and level of operator control. A fixed camera may work when every demonstration takes place in one defined area. More complex demonstrations may require an operator-controlled camera or several camera feeds selected through a vision mixer.
Is Live Video Better Than A Pre-Recorded Product Demonstration?
Not always. Live video is useful when visitors need evidence that the product is operating in real time. Prepared video may communicate lengthy processes, internal mechanisms or actions that cannot be repeated safely or practically on the exhibition stand. Many demonstrations can use both formats.
What Size LED Screen Is Suitable For An Exhibition Stand?
Suitable size depends on the stand dimensions, viewing distance, expected audience group, product size and content. The display should provide enough image area for visitors to see the required detail without consuming demonstration space or competing visually with the physical product.
Does Pixel Pitch Matter For Close-Up Product Demonstrations?
Yes. Visitors at exhibitions can be relatively close to the display, so pixel pitch affects visible pixel density and close-range image quality. Finer pitch generally supports closer viewing, but screen size, content type, text detail, camera use and actual visitor distance should all influence the final specification.
Can A Laptop Be Connected To An Exhibition LED Screen?
Yes. Depending on the system, the laptop may connect through a video processor, switcher or all-in-one LED controller before the signal is displayed on the LED wall. Output resolution, aspect ratio, refresh behaviour, connection type and signal compatibility should be tested before the exhibition opens.
Do Product Demonstrations Need An Onsite LED Technician?
Not every demonstration does. A simple loop from one prepared playback source may require little live intervention. Onsite technical cover becomes more useful when the demonstration involves cameras, several sources, frequent switching, custom screen layouts or scheduled product launches.
What Should Be Displayed Between Live Product Demonstrations?
Use an approved screen state that still gives visitors useful product information. This might be a short product loop, selected specifications, an animation, a product overview or the scheduled time of the next demonstration. It should be prepared and tested rather than left to an accidental blank input.
